---
title: 'Wordpress installation on a shared hosting with Cpanel | Zomro'
description: 'The article describes how to install Wordpress manually and using the Wordpress Toolkit feature on a shared hosting service with Cpanel...'
image: 'https://dx86q6oq7ry0e.cloudfront.net/uploads/media/blog/a52@server-panel.net/2022/06/01/1655299671_screenshot_28.png'
---
![opened image]()
* [Zomro](https://zomro.com/)
* [FAQ](https://zomro.com/blog/faq/)
* Wordpress installation on a shared hosting with Cpanel
# Wordpress installation on a shared hosting with Cpanel
15-06-2022
Hello!
In this article, I will tell you how to install a website based on CMS Worpdress on Zomro.com shared hosting, on which the Cpanel is installed.
CMS Wordpress in Cpanel can be installed in two ways:
1\. Manual - allows to install the latest version of Wordpress, as well as to get full control over the entire installation and configuration process.
2\. Automatic - carried out by means of the Cpanel, faster way, allows you to install Wordpress in a few clicks.
**Option 1. Manual installation.**
Before we start the Wordpress installation procedure, we need to complete a few preparatory steps:
**1.1. Buy a domain (if you don't already have one) and point it to NS Zomro:**
Specify the following NS servers at the domain registrar:
ns1.zomro.net.
ns2.zomro.ru.
ns3.zomro.com.
ns4.zomro.su.
It may take from 30 minutes to several hours or days for the NS changes to take effect.
If the domain is purchased from us, you can specify NS in your personal account:
Products/Services -> Domains -> select the required domain -> click on the NS button and enter the NS servers listed above.
In this article, I'll use the "zomhost.cf" domain as an example, but you should use your own domain.
**1.2. Adding a website to Cpanel**
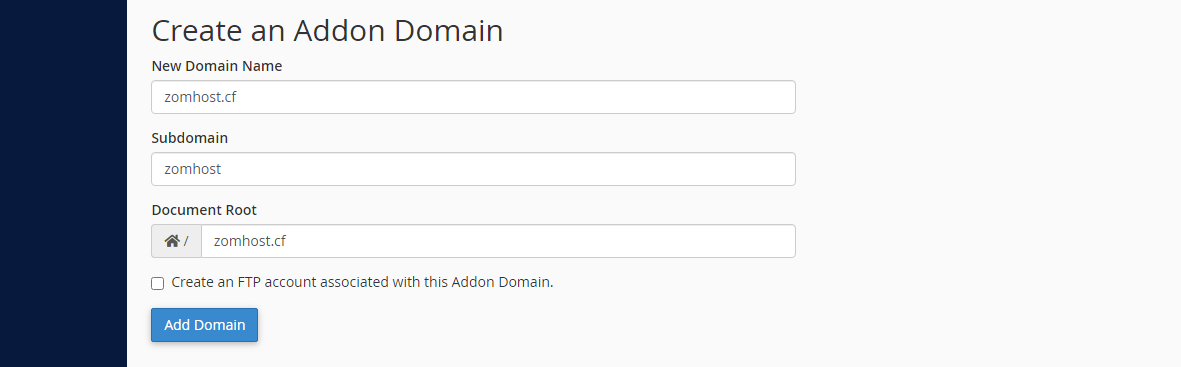
Go to the option Domains -> Addon domains in the Cpanel.
In the next window, enter the name of your domain in the field "New Domain Name"
The fields "Subdomain" and "Document Root" will be filled in automatically.
If necessary, you can specify another document root directory.
Then click the "Add Domain" button
**1.3 (Optional) PHP Version**
This paragraph is optional, Wordpress can run on all PHP versions starting from 5.6
However, to improve the site's speed, as well as to avoid various security vulnerabilities in Wordpress, it is better to use the recommended version, at the time of writing this article - it is PHP 7.4
Go to Software -> MultiPHP Manager and check:
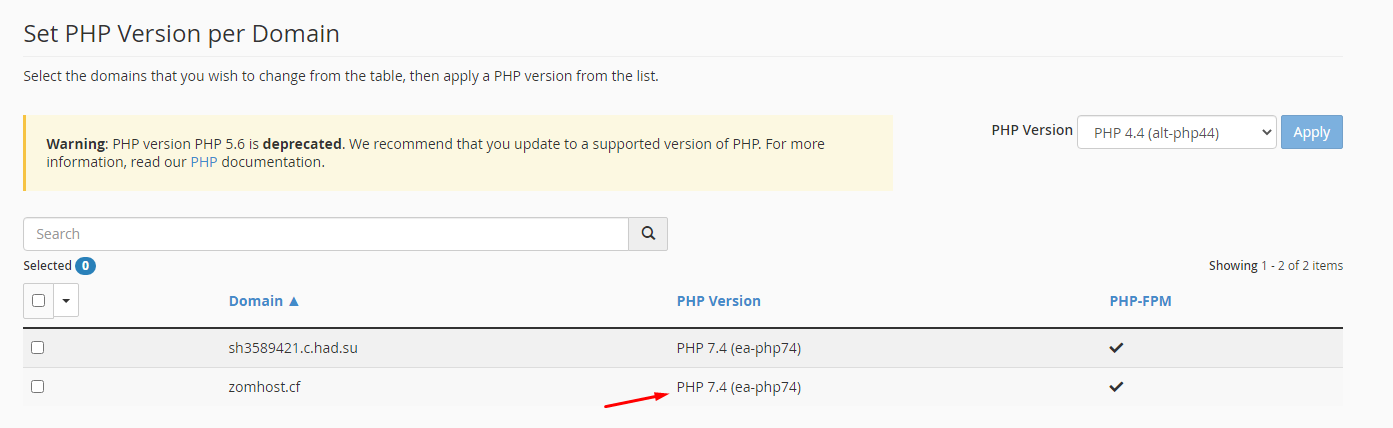
If the PHP version is quite low or not supported at all, set the recommended PHP version, to do this - checkmark your site, select the PHP version on the right side and click the "Apply" button
**1.4. Creating a database in Cpanel**
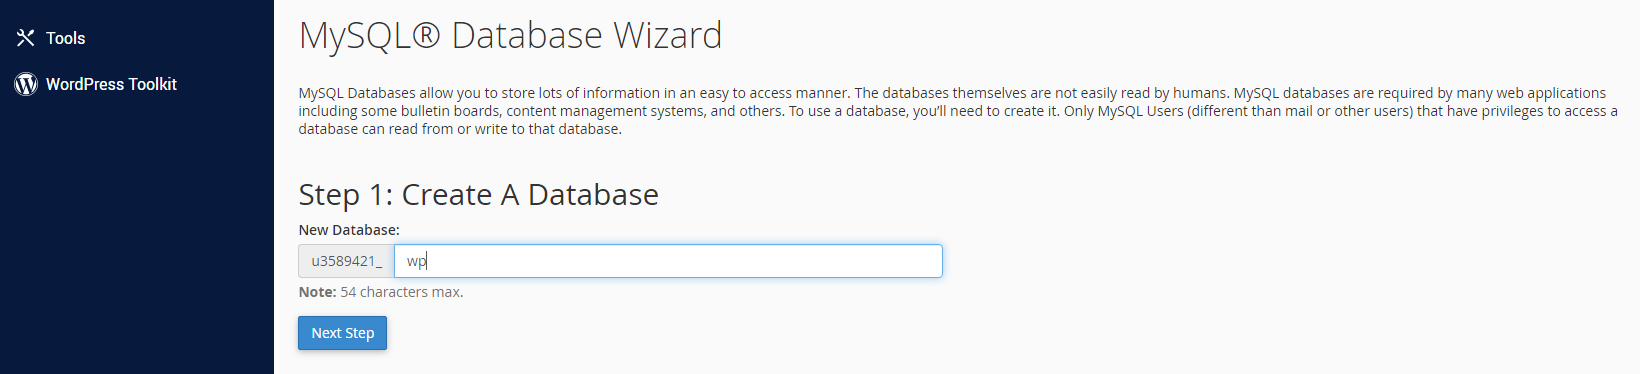
Go to option Databases -> MySQL Database Wizard
In the first step, name the database and write down its name (including the prefix) somewhere:
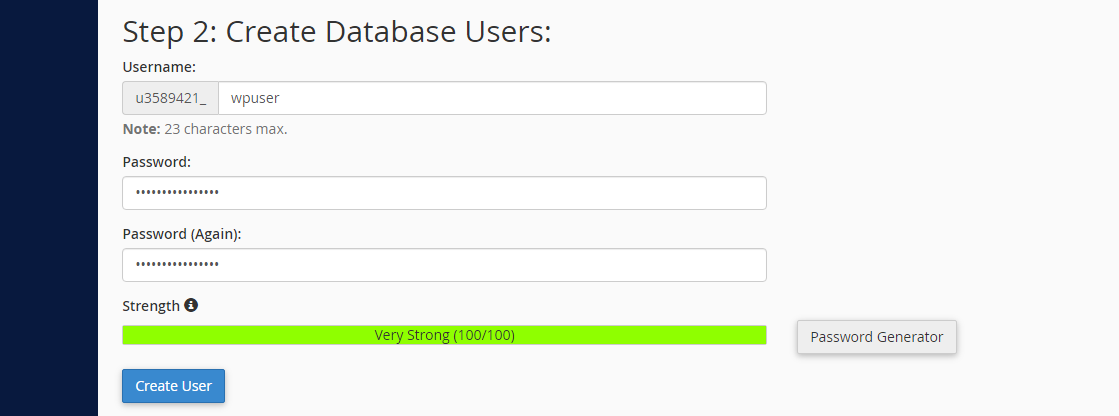
In the second step, specify the username and password, write them down somewhere (including prefix in username), you will need this data later and click the "Create User" button :
In the third step, checkmark the box next to the "ALL PRIVILEGES" option and click the "Make Changes" button:
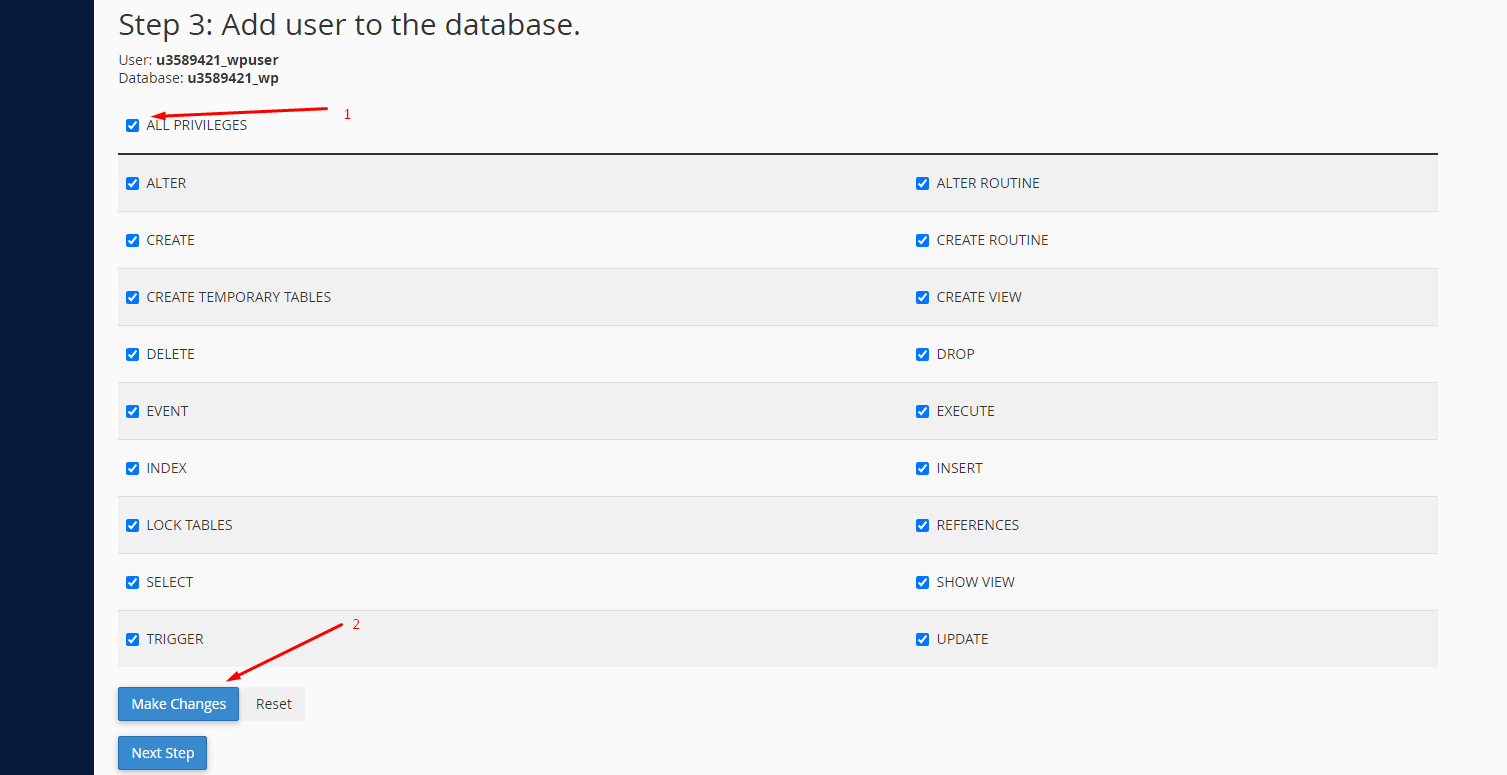Of course, if you know for sure that do not need all the privileges, but only some of them, you can select a required ones.
Now that the site and database have been created, and the domain has been directed to shared hosting, you can start installing Wordpress.
**1.5 Download CMS Wordpress and upload the archive to shared hosting**
First you need to go to the official website and download the latest version of Wordpress, at the moment it is version 6.0.

Let's go to the website folder now and upload the downloaded archive into it.
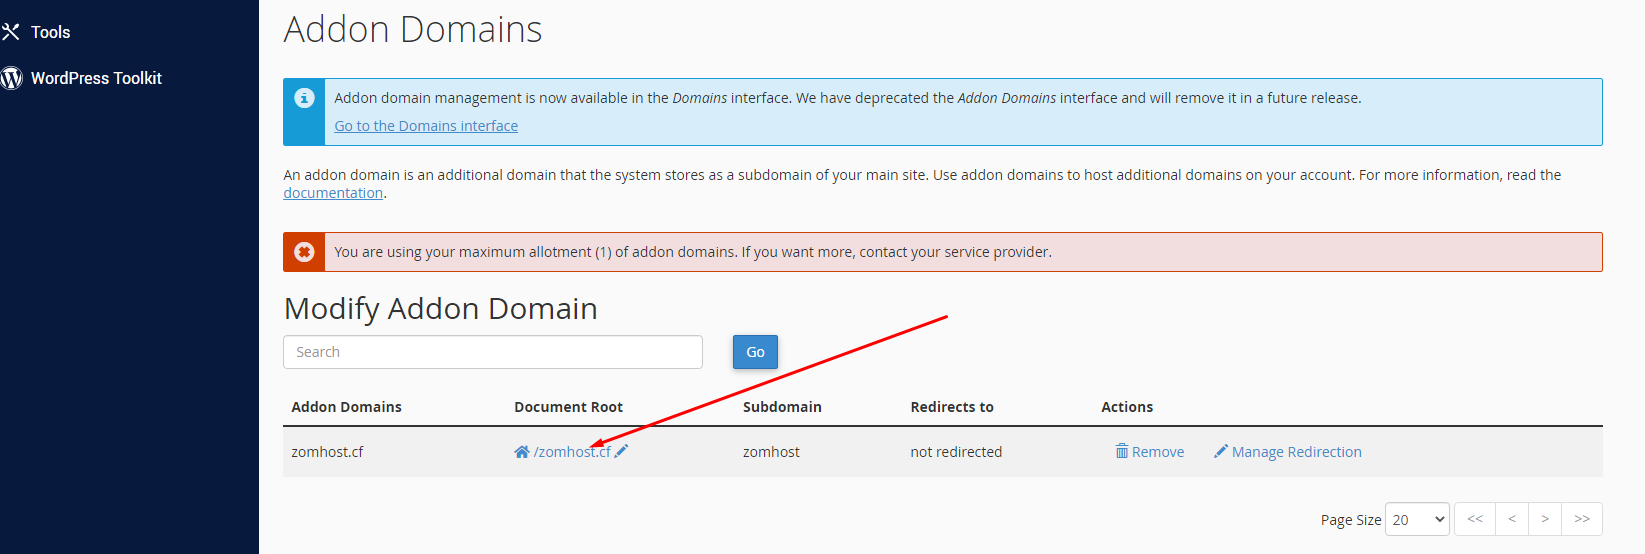
Go to Domains -> Addon Domains -> click on the Document Root link to go to the folder:
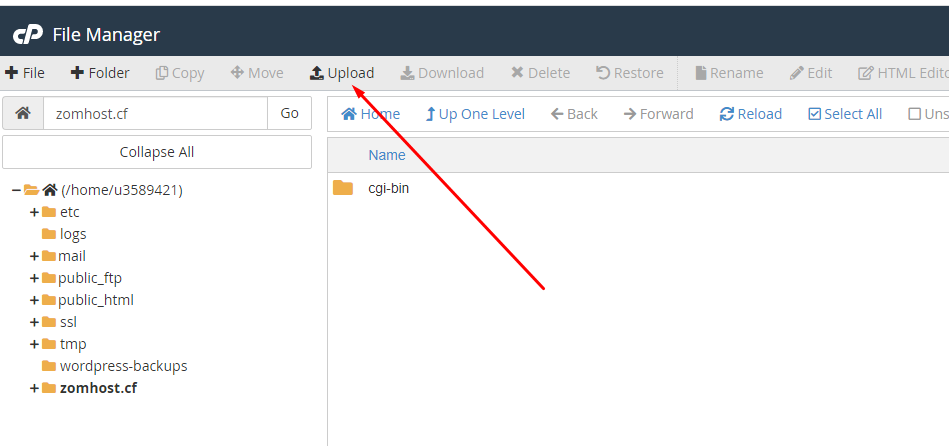
Next, click the "Upload" button and select the downloaded archive to upload:
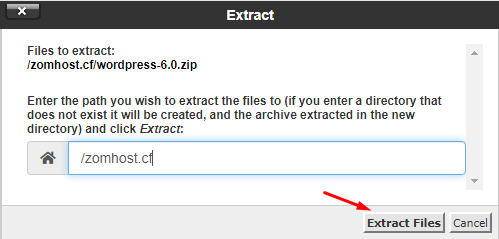
Let's unpack the archive by selecting it and clicking the "Extract" button:

Enter the unpacked "wordpress" folder by double click on it, select all the files and click the "Move" button to move the files from the "wordress" folder to the parent folder, the root of your website:
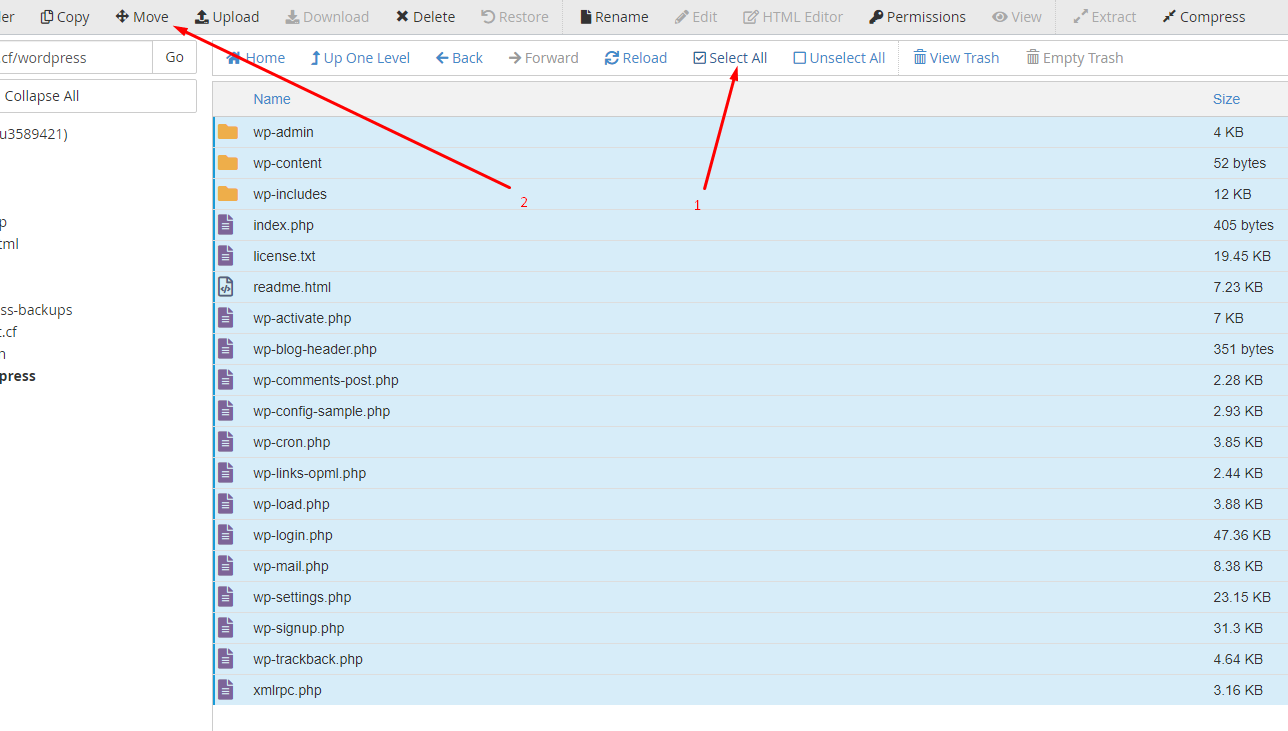
Delete the word "wordpress" from the destination path, leaving only the path to the root folder of your website:
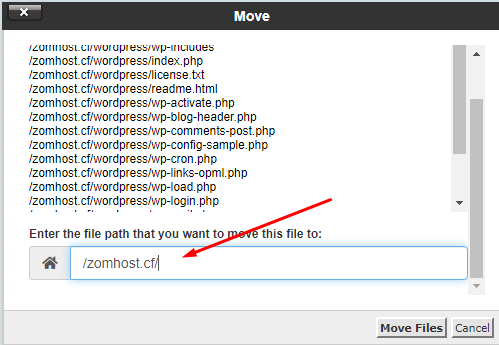
Now the archive "wordpress-6.0.zip", as well as the empty folder "wordpress" are no longer needed, they can be deleted.
**1.6 Connecting the database to the website.**
First, rename the wp-config-sample.php file to wp-config.php so that the Wordpress engine could start using this file.
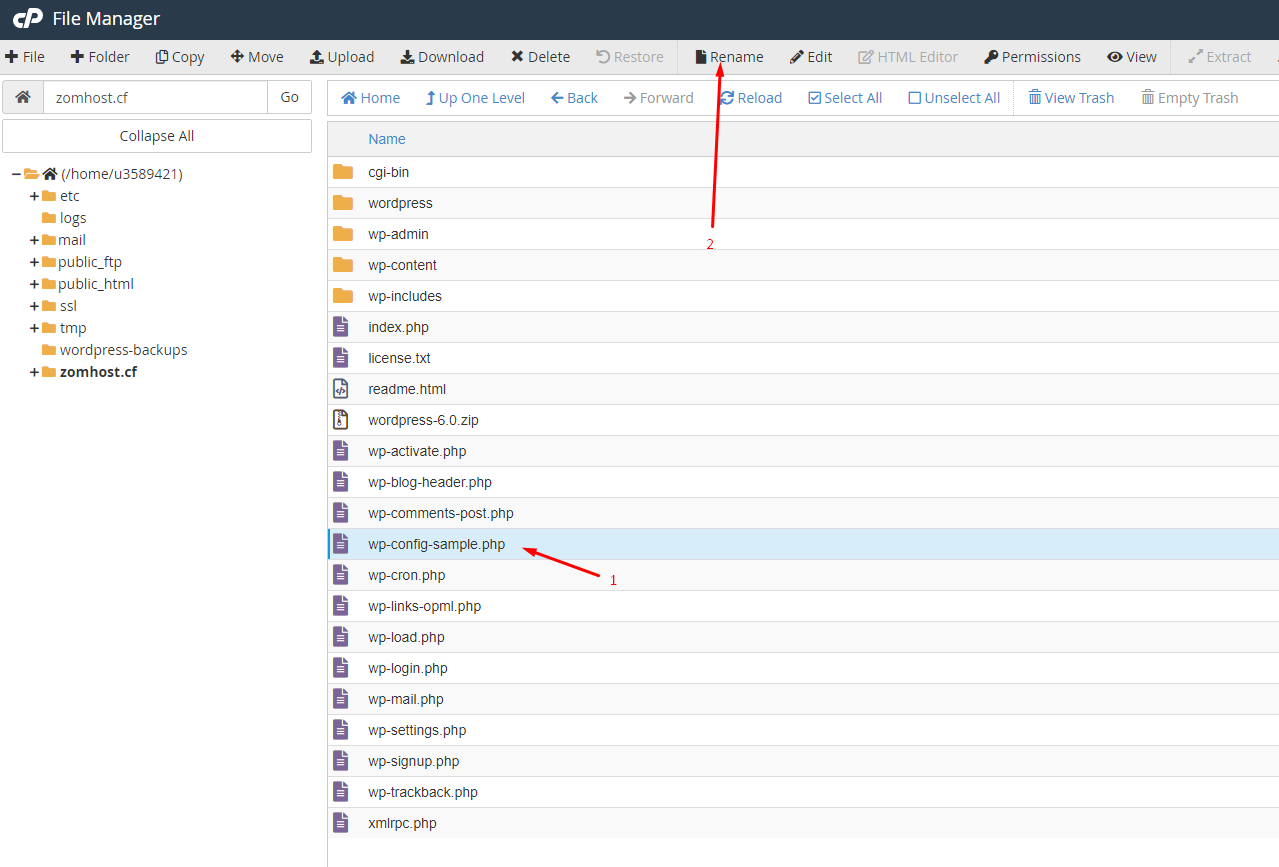
Next, select open the wp-config.php file in the editor by clicking the "Edit" button.
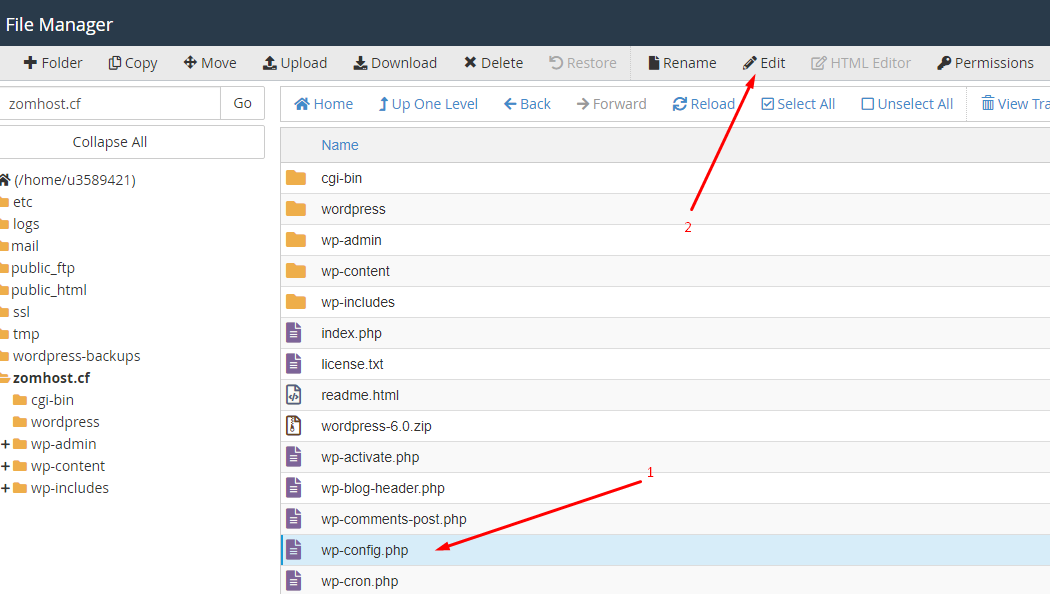
If a window appears with a warning about changing the encoding, select utf-8 and click the Edit button:
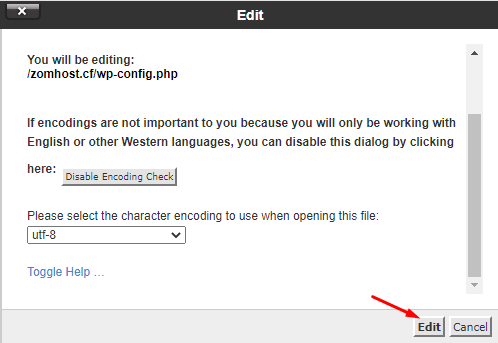
In the wp-config.php file that opens with text editor, find the following lines:
define( 'DB_NAME', 'database_name_here' );
define( 'DB_USER', 'username_here' );
define( 'DB_PASSWORD', 'password_here' );
Specify the database connection data that you stored earlier on the step of creating the database at the preparatory stage, in these lines.
Replace "database_name_here" with the name of the database.
Replace "username_here" with your database username
Replace "password_here" with the password for the database user.
Here is an example, mine looks like this:
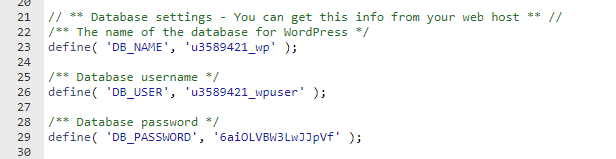Click the button "Save Changes" to save the file.
**1.7 (Optional) Generate unique phrases.**
This paragraph is optional, you can skip it, but it is recommended to do it for the purpose of increasing your website's security.
Follow this link:
Copy the text you see in your web browser:
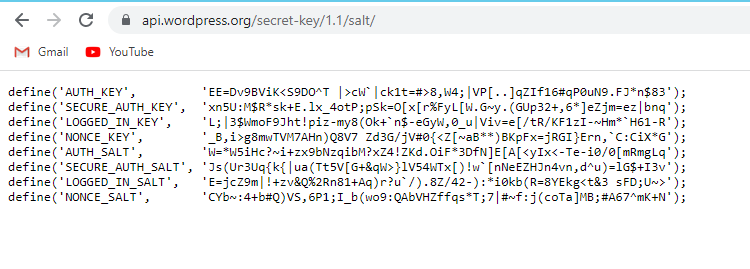And replace the same fields in the wp-config.php file.
Here is an example of how it looks after the replacement in the file:
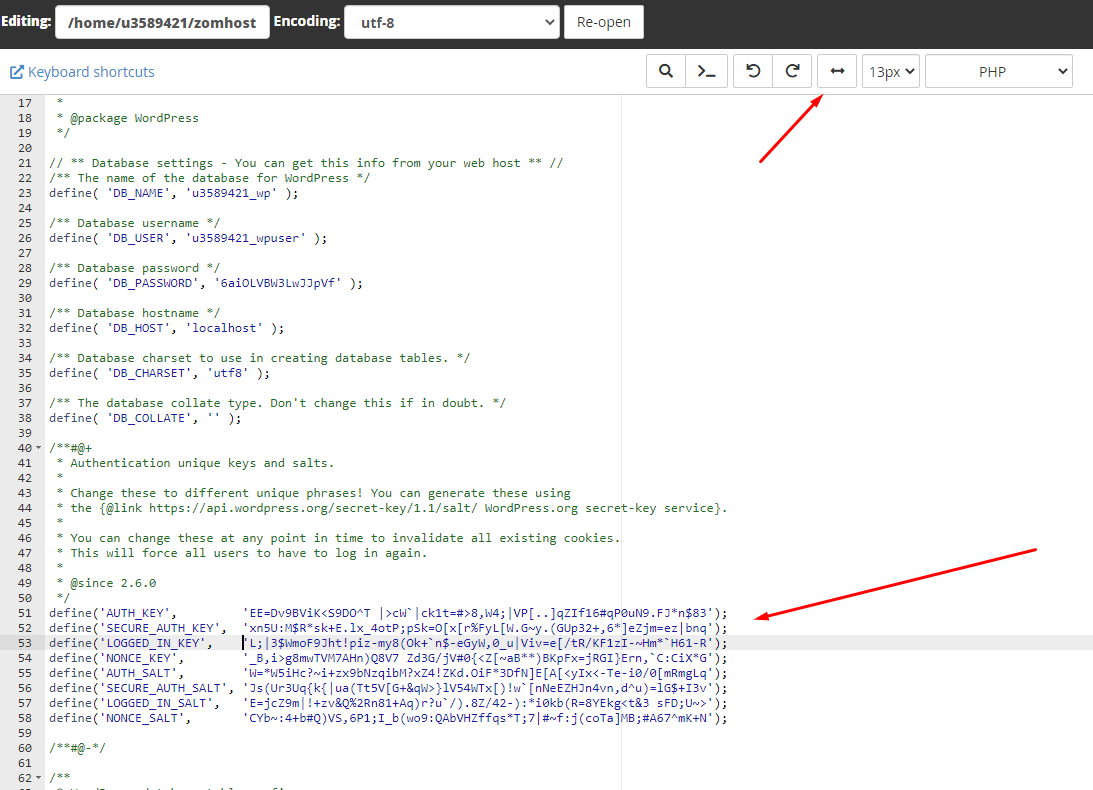Click the button "Save Changes" to save the file.
**1.8 Final installation step**
At this stage, we have uploaded the CMS Wordpress files to our website, connected the database in the configuration file, it remains to complete only the final step .
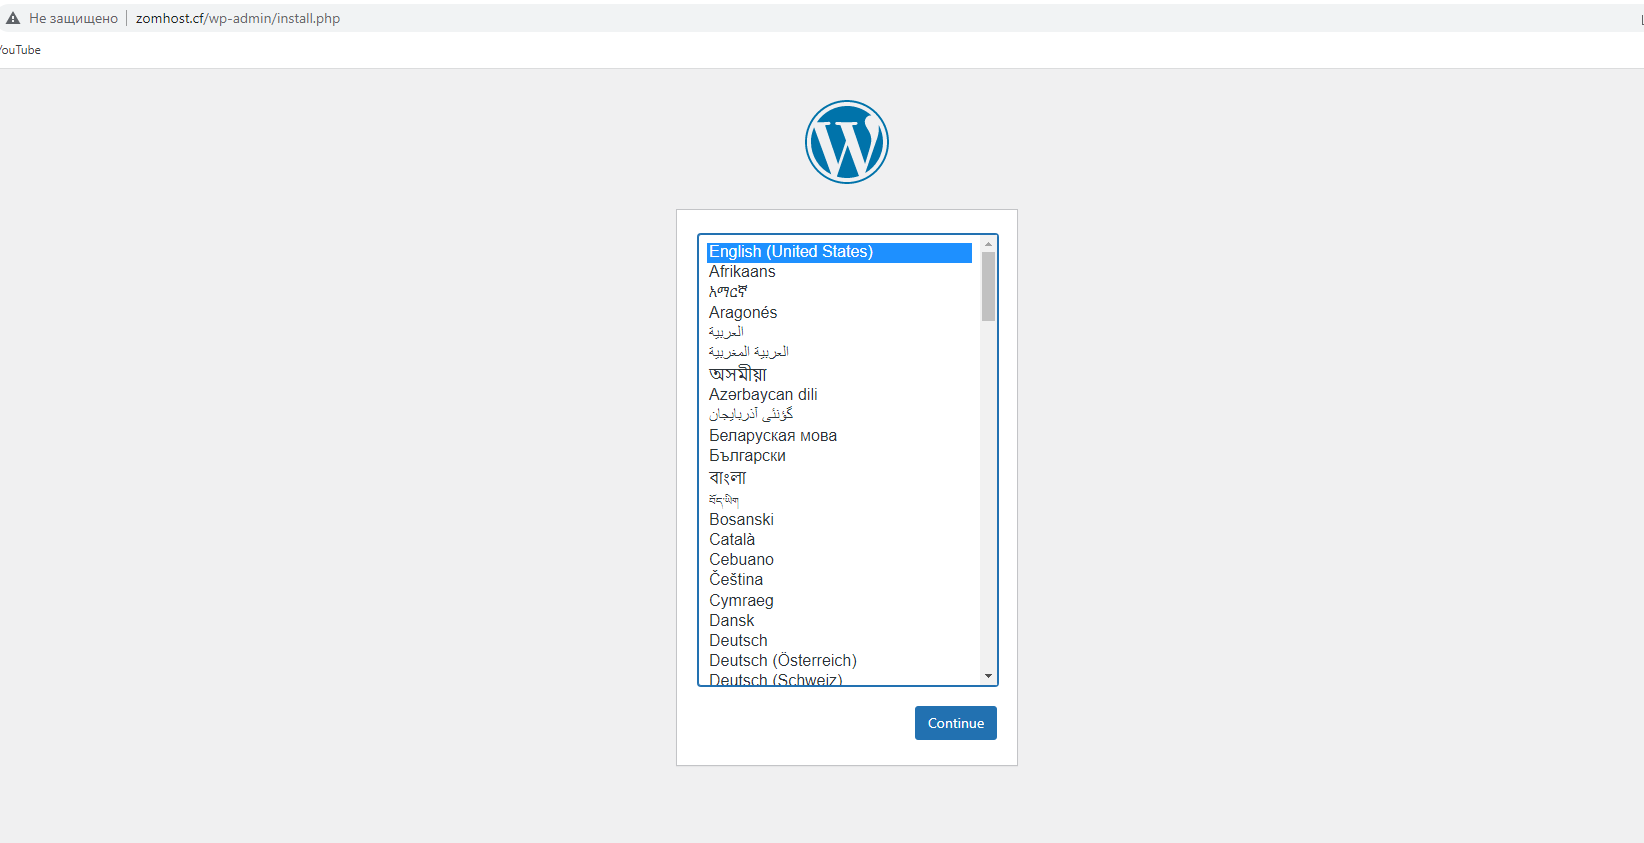
Go to your domain link in a web browser (http://YourDomainHere), you will see the following language selection menu, select your preferred language and click the "Continue" button:
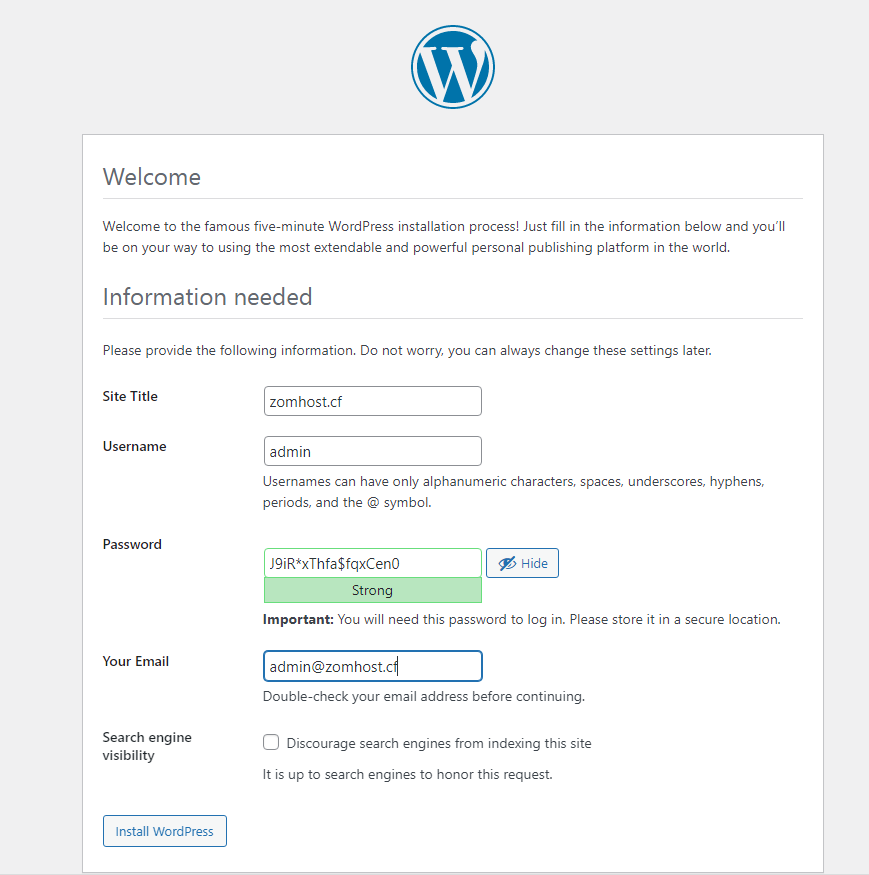
In the next welcoming window, fill in the fields "Site Title", "Username", "Password", "Your Email"
Write down the username and password somewhere, you will be using this credentials to access the WordPress admin panel later after installation.
Also, if this is a test site, you can checkmark the option "Discourage search engines from indexing this site"
For all permanent websites, it is recommended to leave this option unchecked and just skip it.
To complete the installation, it remains to click the "Install WordPress" button:
If everything was done correctly, you will see a window about the successful installation of Worpdress:
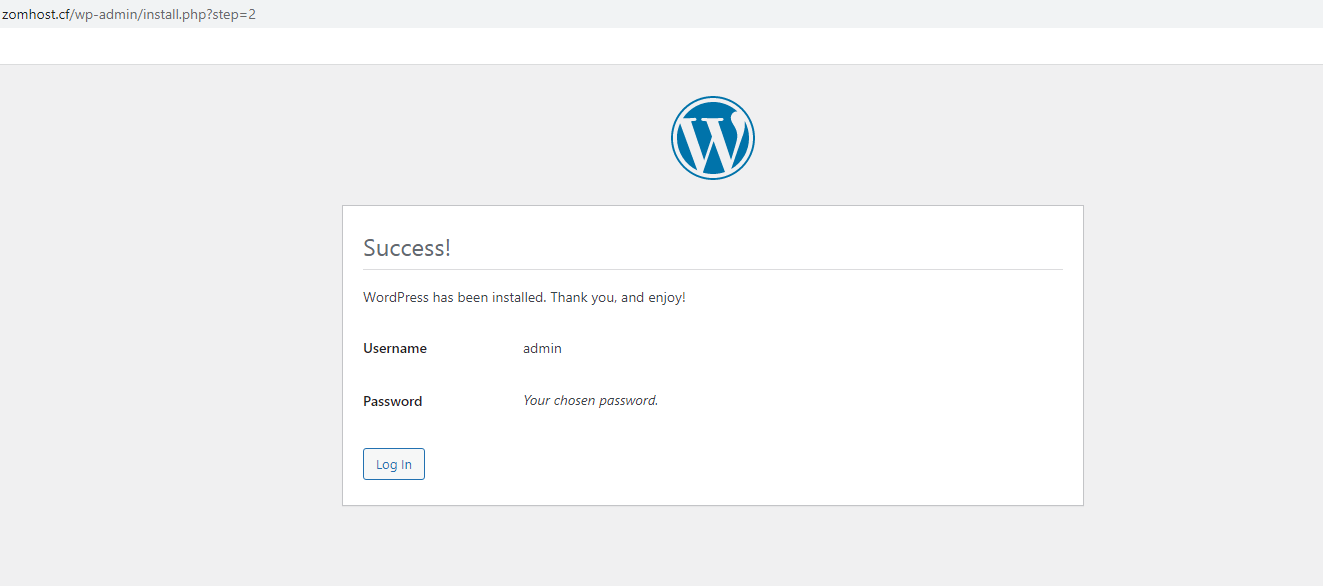
? Congratulations! ? Wordress has been installed!
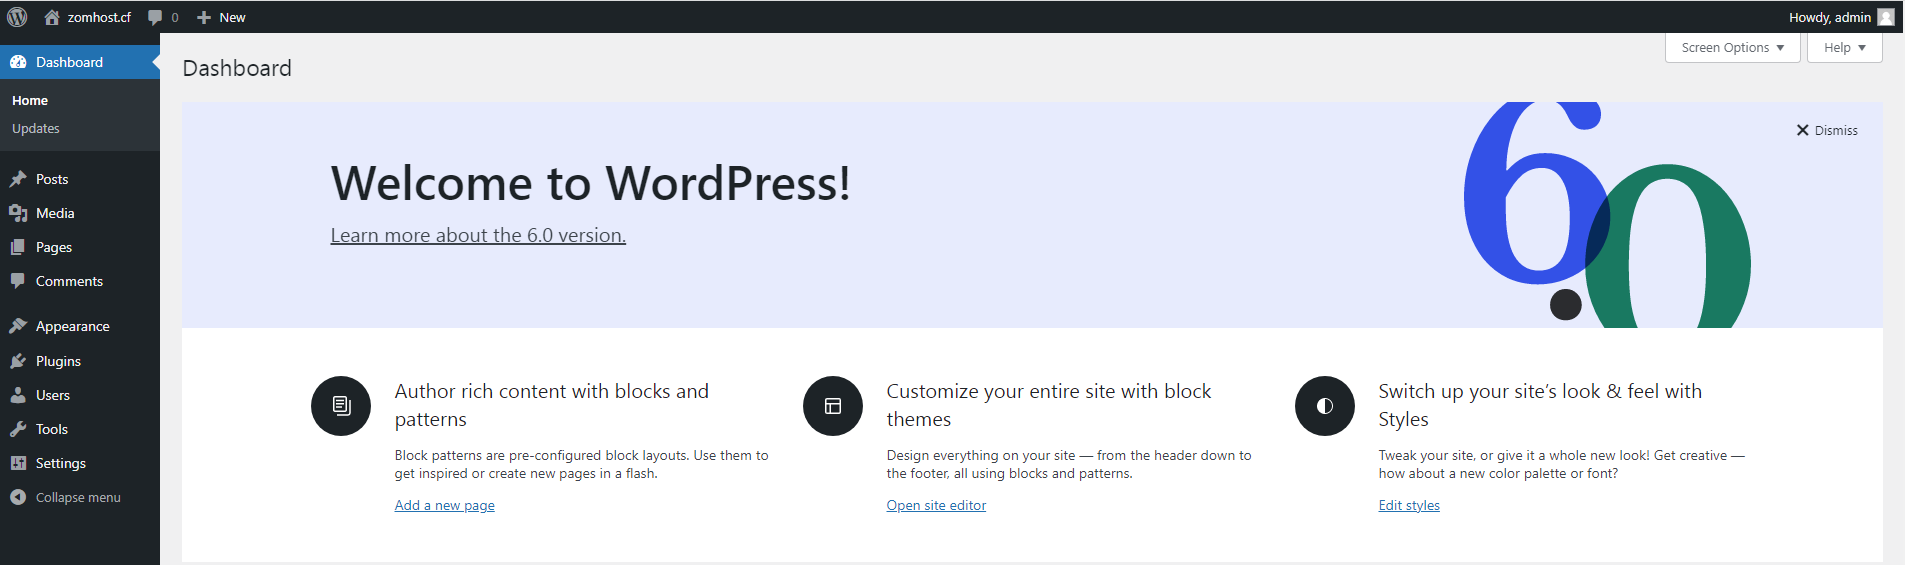
To enter the Wordpress admin panel, follow the link and enter your username and password:
http://YourDomainHere/wp-login.php
**Option 2: Install via Wordpress Toolkit**
Before we start the Wordpress installation procedure, we need to complete 2 preparatory steps:
**2.1. Buy a domain (if you don't already have one) and point it to NS Zomro:**
Specify the following NS servers at the domain registrar:
ns1.zomro.net.
ns2.zomro.ru.
ns3.zomro.com.
ns4.zomro.su.
It may take from 30 minutes to several hours or days for the NS changes to take effect.
If the domain is purchased from us, you can specify NS in your personal account:
Products/Services -> Domains -> select your domain -> click on the NS button and enter the NS servers listed above.
In this article, I'll use the "zomhost.cf" domain as an example, but you should use your own domain.
**2.2. Adding a website to Cpanel**
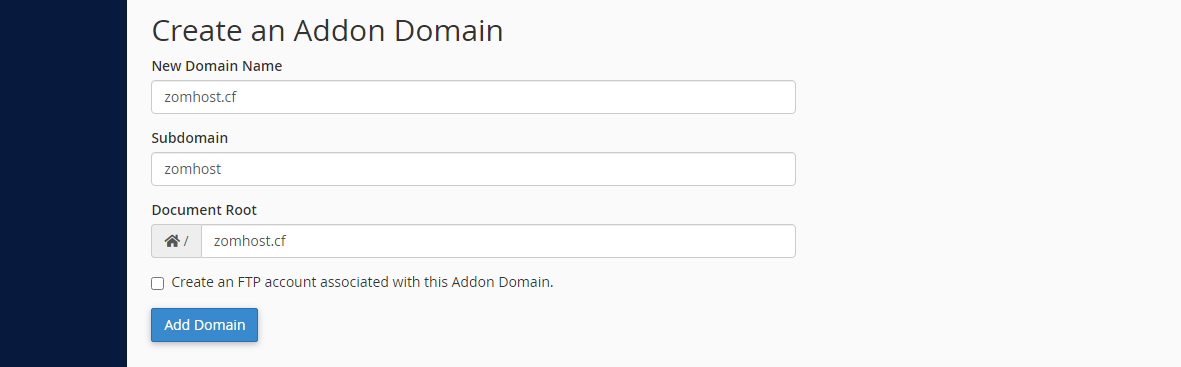
Go to the option Domains -> Addon domains in the Cpanel.
In the next window, enter the name of your domain in the field "New Domain Name"
The fields "Subdomain" and "Document Root" will be filled in automatically.
If necessary, you can specify another document root directory.
Then click the "Add Domain" button
**2.3 Installation procedure**
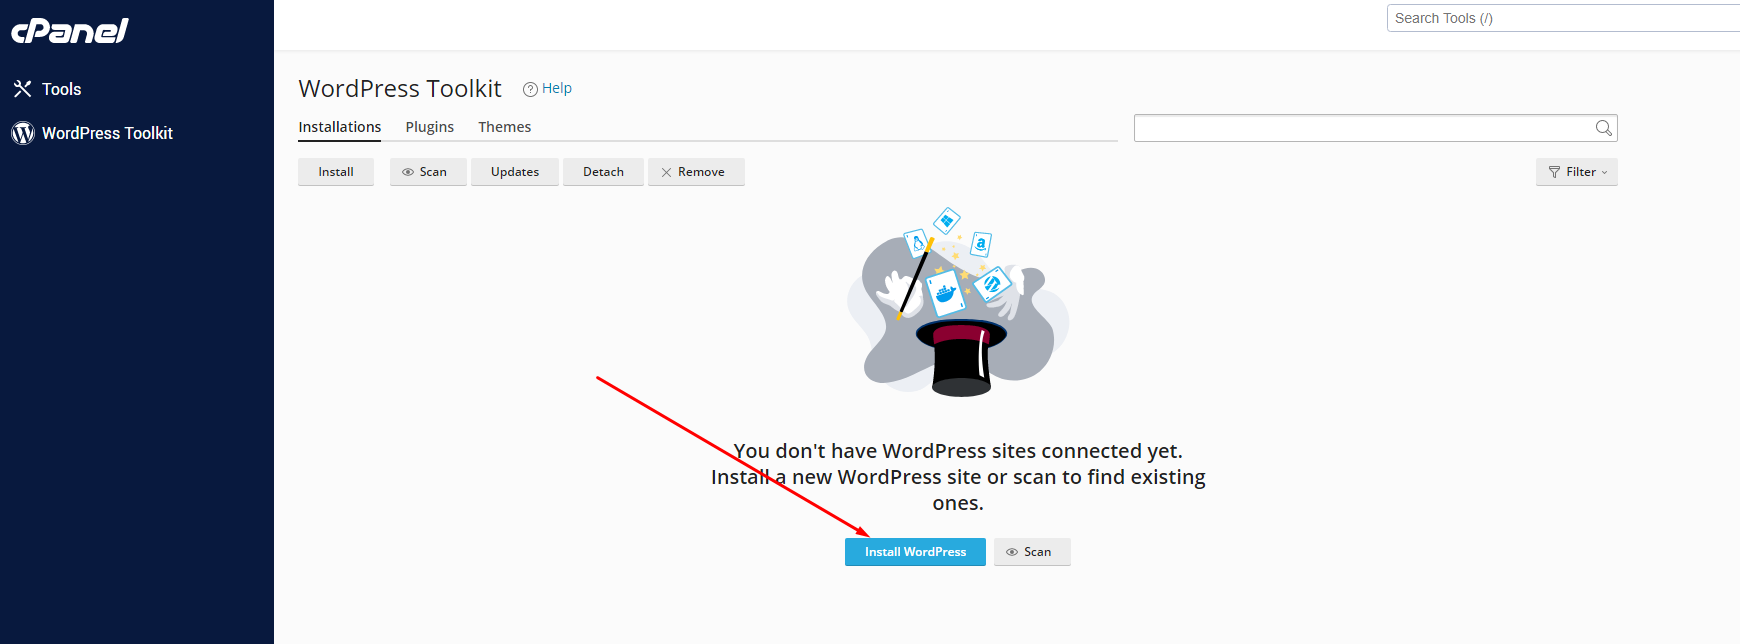
Go to Domains -> Wordpress Toolkit and in the next window click the "Install Wordpress" button:
In the settings window that opens, you need to fill in the following mandatory fields:
"Installation path": select your domain from the dropdown list
"Website title": enter the name of your website
"Plugin/theme set": select the set of plugins to install that you need, or leave the option at "None" for a basic installation.
"Website language ": select the interface language for the website
"Version": select the desired version of Wordpress (usually the latest one is the best)
Write down the "Username" and "Password" somewhere, or enter your own. You will use this credentials to log in to the website's admin panel.
"Email": Enter your email
The database and automatic update settings can be left as is, by default. Database will be created automatically.
Check all the entered data and click the "Install" button: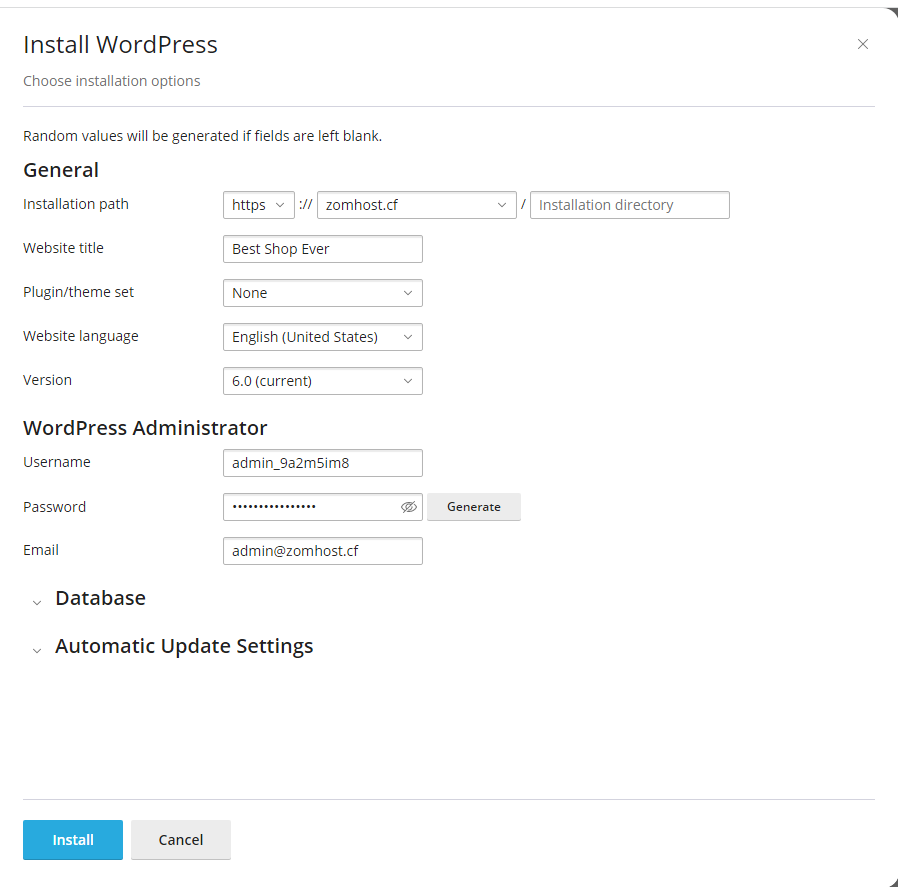Wait for installion to complete:
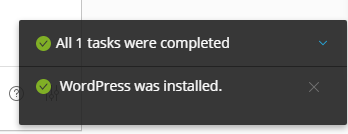
? Congratulations ?, Wordpress installation has been successfully completed.
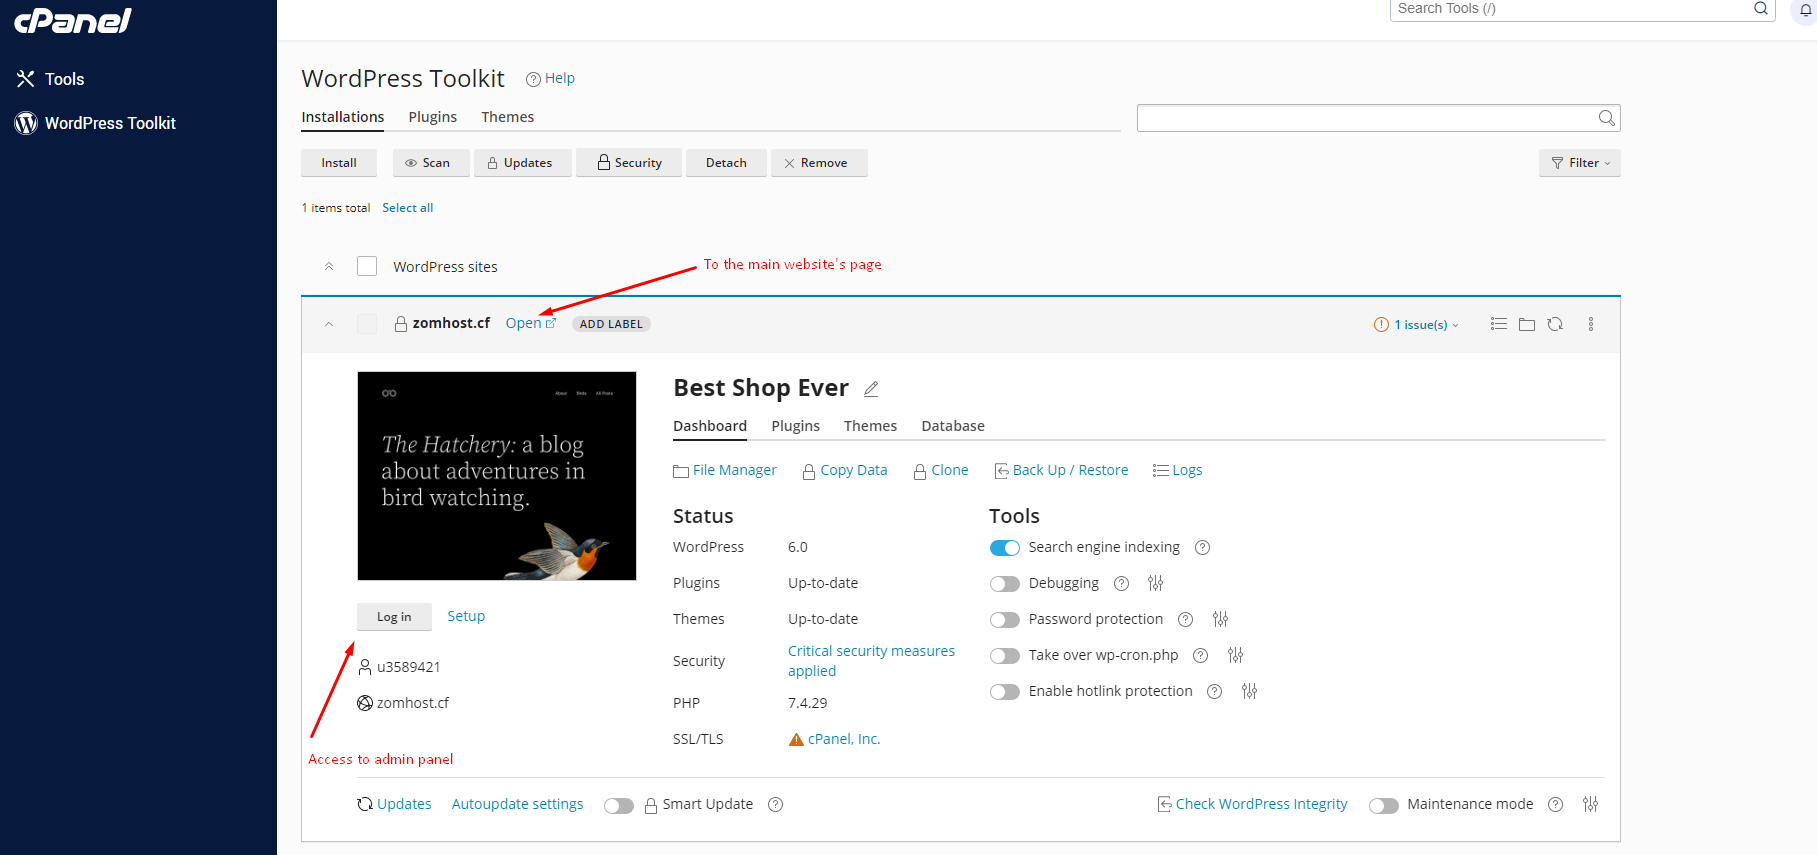
In the next window you will see various options for managing your site:
In this article, we got acquainted with the creation of our website on Zomro shared hosting service and the installation of Wordpress in the Cpanel in two ways.
I hope this article was helpful to you, have a nice day!
Similar articles:
[Error 406 Not Acceptable](https://zomro.com/blog/faq/491-error-406-not-acceptable) [Installing a game server for Terraria - TShock on Centos 7](https://zomro.com/blog/faq/250-ustanovka-igrovogo-servera-dlja-teraria-tshock-na-centos-7) [How to view Centos 7 server logs](https://zomro.com/blog/faq/350-how-to-view-centos-7-server-logs) [How to create and connect via sFTP to an additional user](https://zomro.com/blog/faq/305-kak-podkljuchitsja-po-sftp-ljubomu-drugomu-polzovatelju) [How to change language in Windows 2012](https://zomro.com/blog/faq/275-kak-smenit-jazyk-v-windows-2012)
[ GPU server from €174.80/mon ](/dedicated-servers/type=gpu)