In this article, we will discuss micro-caching: why it is needed, how to configure it, and what pitfalls may arise along the way.
What is micro-caching?
Micro-caching is a type of cache that fully creates page files and allows serving a ready-made page instead of making a request to the backend server.
The main downside of such caching is, of course, that pages are updated very rarely. But what are the advantages of such caching?
Let's take a situation with a weak server and a fairly fast website, but it receives a large number of requests from bots. They will load both the backend and the database, which will lead to a drop in website performance, and it will load more slowly. Here, micro-caching comes to the rescue: we simply serve already prepared pages, without loading either the backend or the database server. Micro-caching also allows pages to load much faster because there is no need to wait for a response from the backend with each request.
Such cache is not suitable for dynamic websites and admin panel pages, but if you have a page that you update, for example, once a day, then this is an excellent option.
Now we can move on to configuring micro-caching.
Configuring micro-caching
For this, we need a directory where our cache will be stored.
In this article, a part of RAM will be used as disk space, as it is more efficient than storing such files on disk.
First, let's create a directory where our cache will be stored, in our case /home/cache:
mkdir /home/cache
We will mount 1 GB of RAM as storage for files using the command:
mount -t tmpfs -o size=1G tmpfs /home/cache
And we will add the mounting of this space at each server startup (you need to add this line to the /etc/fstab file):
tmpfs /home/cache tmpfs rw,size=1G 0 0
We also set secure permissions for the directory:
chown www-data:www-data -R /home/cache
chmod 700 /home/cache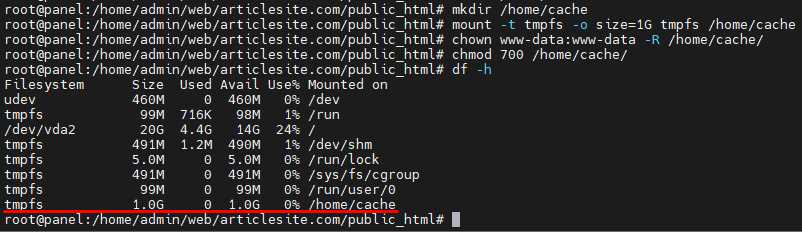
Done, we have prepared a place for the cache. The advantage of this solution is that when the server is restarted, the entire cache is cleared.
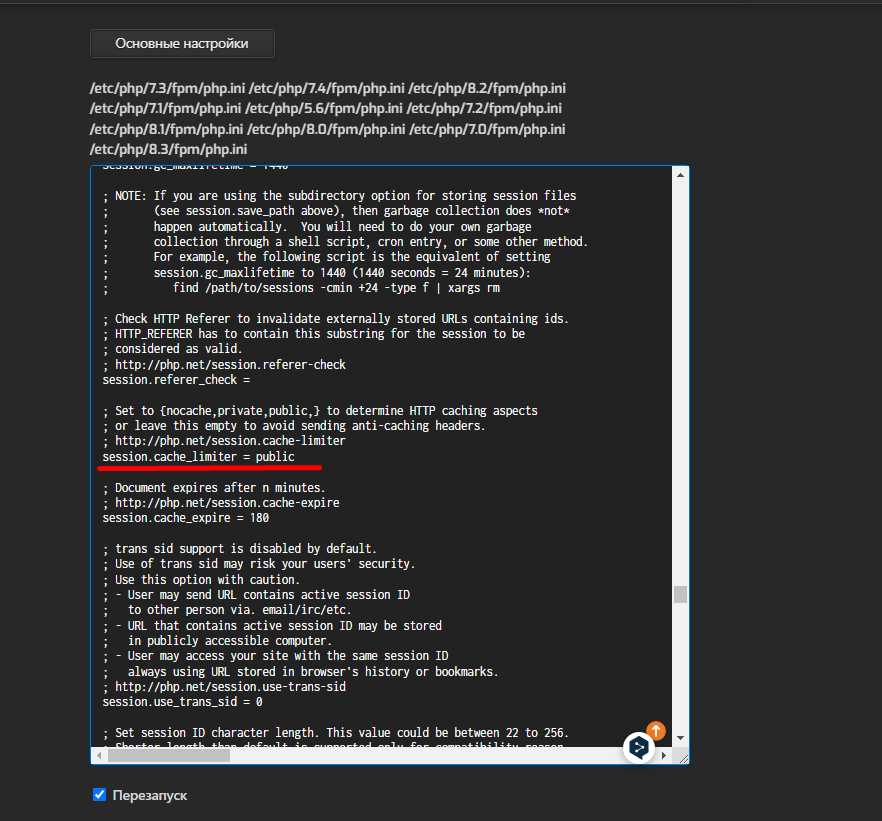
Now we will address potential pitfalls that may hinder working with the cache, and due to which it may not work even if cache files are being created. The first thing to do is to set the PHP parameter session.cache_limiter to public, otherwise the website header will indicate Pragma: no-cache, which will prevent us from using and creating the cache correctly.
The second pitfall is that you need to add a line to your website's .htaccess file. I recommend setting max-age the same as the rest of the cache, so that the cache does not become stale:
Header set Cache-Control "max-age=300, public"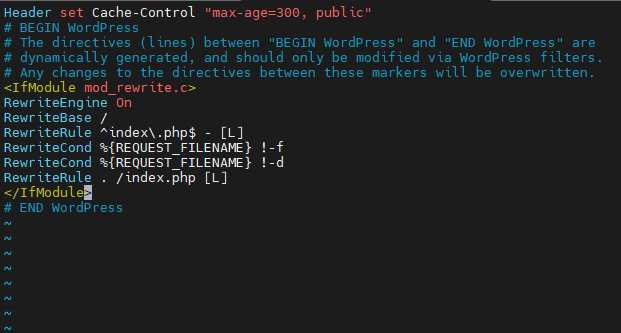
Now we can be sure that almost nothing will prevent us from using the cache. The most important thing I will leave for last, namely the configuration of Nginx.
In the file /etc/nginx/nginx.conf, you need to add the following lines to the http section:
proxy_cache_path /home/cache levels=1:2 keys_zone=global_cache:100m max_size=1g inactive=5m;
proxy_cache_valid any 5m;
proxy_cache_valid 200 5m;
proxy_cache_valid 404 15s;
proxy_cache_use_stale error timeout invalid_header updating http_500 http_503;
proxy_cache_lock on;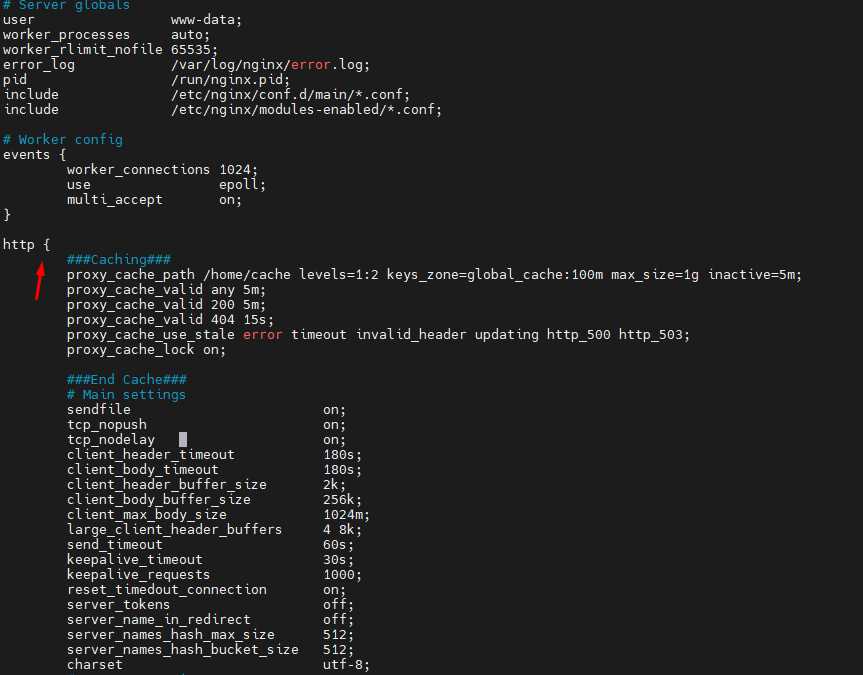
In the configuration file of the site itself, in the location / block, you need to add the following lines:
location / {
proxy_cache global_cache;
add_header X-Cache-Status $upstream_cache_status;
proxy_cache_key $host$request_uri;
proxy_ignore_headers "Set-Cookie";
proxy_pass http://backend;
}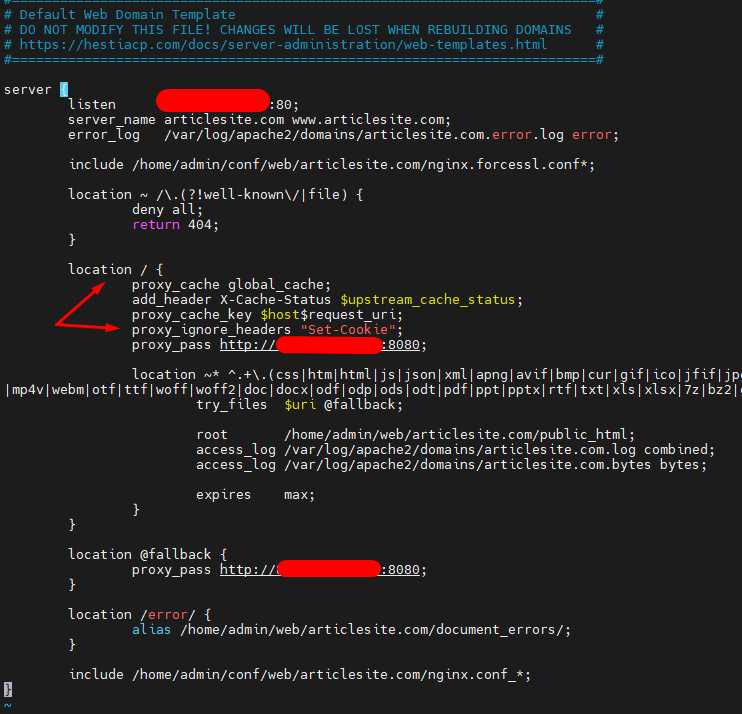
For ISPManager, these lines need to be added to the location @fallback block, as all requests to the backend go through this block.
Now I will explain what each line we added in the configurations is responsible for:
proxy_cache_path /home/cache levels=1:2 keys_zone=global_cache:100m max_size=1g inactive=5m;- proxy_cache_path — the path where the cache will be stored.
- levels=1:2 — you can use no more than 3 levels of nesting (for example, 1:2:3). The numbers correspond to the number of characters in the names of the cache directories, which is necessary for fast operation on slow disks. If you use only
levels=1, on slow disks the cache will be of little use, as a large number of files will be created. I recommend using the ready-made configuration. - keys_zone=global_cache:100m — the name of the zone that our sites will refer to. If the cache is configured for the
global_cachezone, it will look for files specifically in the/home/cachedirectory.100m— the size of the name zone for the cache. - max_size=1g — the total size of the cache.
- inactive=5m — the time during which the cache is considered active. If the cache is not accessed during this time, the system considers it inactive and may delete it.
proxy_cache_valid any 5m;— the time during which the cache will be stored.anymeans that all HTTP codes, except those specified separately, will be stored for 5 minutes.proxy_cache_use_stale error timeout invalid_header updating http_500 http_503;— allows using stale cache in case of the errors specified in the line.proxy_cache_lock on;— prevents the creation of identical caches from multiple requests simultaneously.proxy_cache global_cache;— specifies which cache zone the site will use.proxy_cache_key $host$request_uri;— cache status check. If the header showsX-Cache-Status: HIT, then everything is configured correctly. IfMISS, then you need to look for reasons.proxy_ignore_headers "Set-Cookie";— allows creating a request while ignoring cookies. Without this, the cache will not showHIT, as each request will be unique.proxy_pass http://backend;— here you need to specify the IP and port of the backend server (for example,localhost:8080, if Apache2 is used as the backend server).
You can check the cache status with the command:
curl -I http://Your_site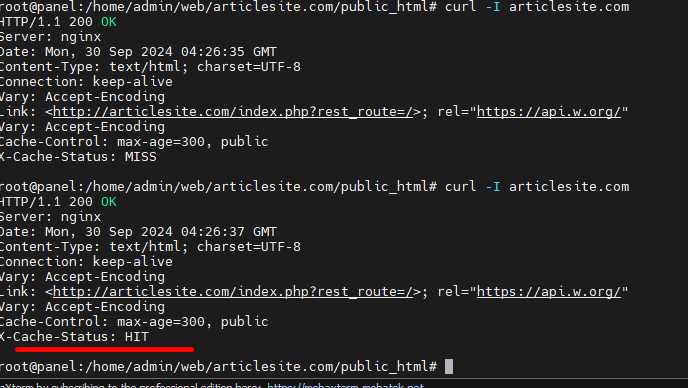
In the response, there will be a header X-Cache-Status: HIT (or MISS, BYPASS). Anything that is not HIT is an error.
Done. We have configured micro-caching on the site.
*The site articlesite.com was created specifically for the article.
We also suggest considering other useful articles: